Using VSCode Instead of BlueJ - VUW ECS
Students taking COMP102 at Victoria University of Wellington (VUW) are recommended to use BlueJ for Java programming. However some students may want to use their own IDE, such as VSCode. Hence, this tutorial guides you through the steps of using VSCode to complete COMP102 assignments.
Note: Currently this tutorial is for Windows only.
1. Install Java
The first part is to install Java. Up to 2024, COMP102 is using Java 8. Here is the link to install Java 8: https://www.java.com/download/ie_manual.jsp.
Click on the execution file and follow the installation steps. If you have chosen a different location to install, please remember this location, as we are going to use that later.
However, this is not enough. The second part is to add Java to our PATH, so that we can use the java command line wherever we want.
Step 1: Check the location of the “java.exe” file. Normally it is under “C:\Program Files\Java\jdk-21\bin”. If you are unsure, you can do a search in Windows Files.
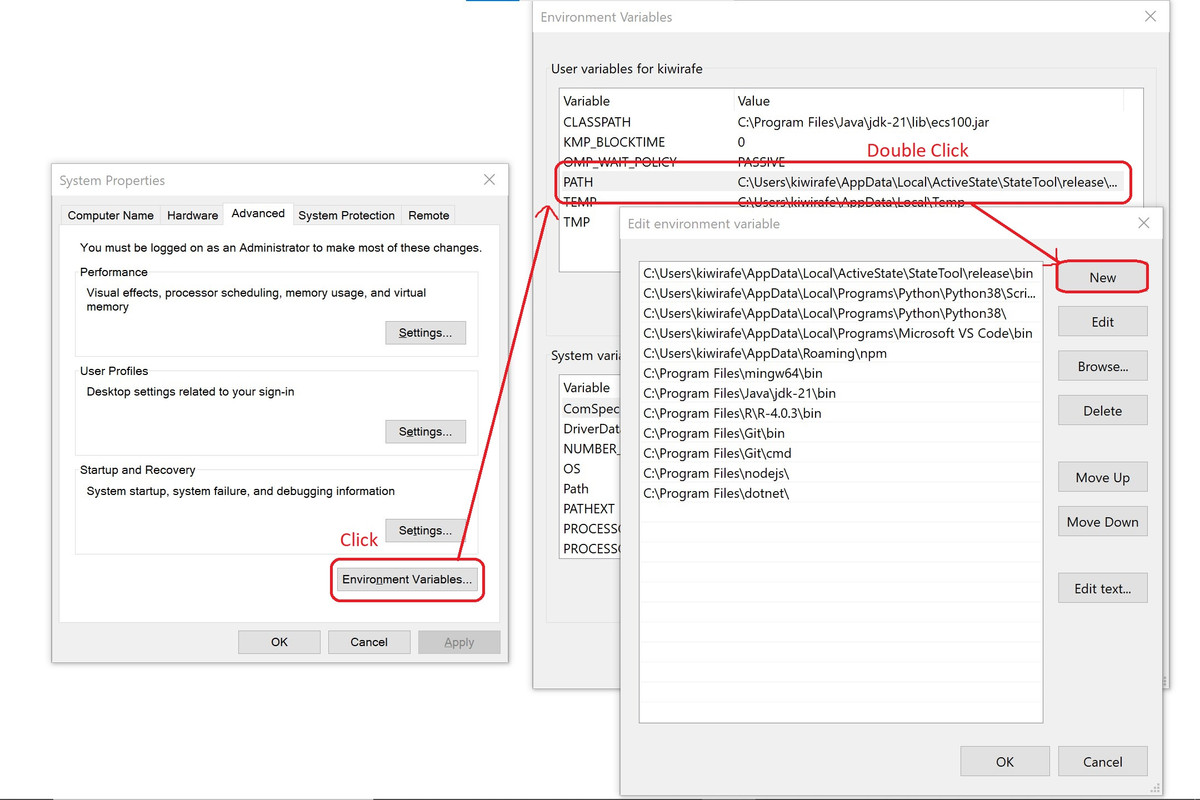
Step 2: Click on “Search” or press Windows key and type in “PATH”. You should see “Edit system environment variables” as an option. Choose that option, and you should see the “System Properties” panel pop up. Click on the Environment Variables” button at the bottom right corner. You should then see a second panel with a list of variables. Now double click on the “PATH” variable, and you should see a third panel with a list of PATHs. Finally, click on the “New” button.
The following image shows Step 2:
Step 3: Input the location of the “java.exe” file from Step 1. Click on “OK” three times (on three different panels).
Step 4: Reboot the computer.
Step 5: Create a simple Java file named as test.java and copy the following code into the file.
class test {
    public static void main(String[] args) {
        System.out.println("Hello World!");
    }
}
Step 6: Open terminal from the location of the Java file. In VSCode you can do this with Control + `. Now run java test.java. You should see “Hello World!” being printed from terminal. This means that you have installed Java successfully!

Install ECS100 Library
Now we have to install the ECS100 library provided by VUW ECS in order to complete the COMP102 assignments. The first part is to install the library. Here is the link to install the library: https://ecs.wgtn.ac.nz/foswiki/pub/Courses/COMP102_2024T1/JavaResources/ecs100.jar.
The second part is to use the .jar file.
Step 1: Place the .jar file into the same folder as the test.java file you have used in the previous section.
Step 2: Copy the following code into the test.java file.
import ecs100.*;

class test {
    public static void main(String[] args) {
        UI.setFontSize(20);
        UI.drawString("Hello World!", 100, 100);
    }
}
Step 3: Open the terminal and run java -cp "ecs100.jar" test.java. You should see “Hello World!” printed on a UI panel. This means you have installed the library successfully!
Future on, you can use the command java -cp "ecs100.jar" {filename}.java to run you Java files. However, we can omit the -cp "ecs100.jar" with the following steps. Note that this is not recommended in large projects, where we are dealing with multiple Java files and libraries. However in this case we can use this trick to save us some effort when working with a single Java file.
Step 4: Copy the “.jar” file into somewhere that you won’t accidentally delete. For example, I have put it in “C:\Program Files\Java\jdk-21\lib” (this is where standard Java libraries are located).
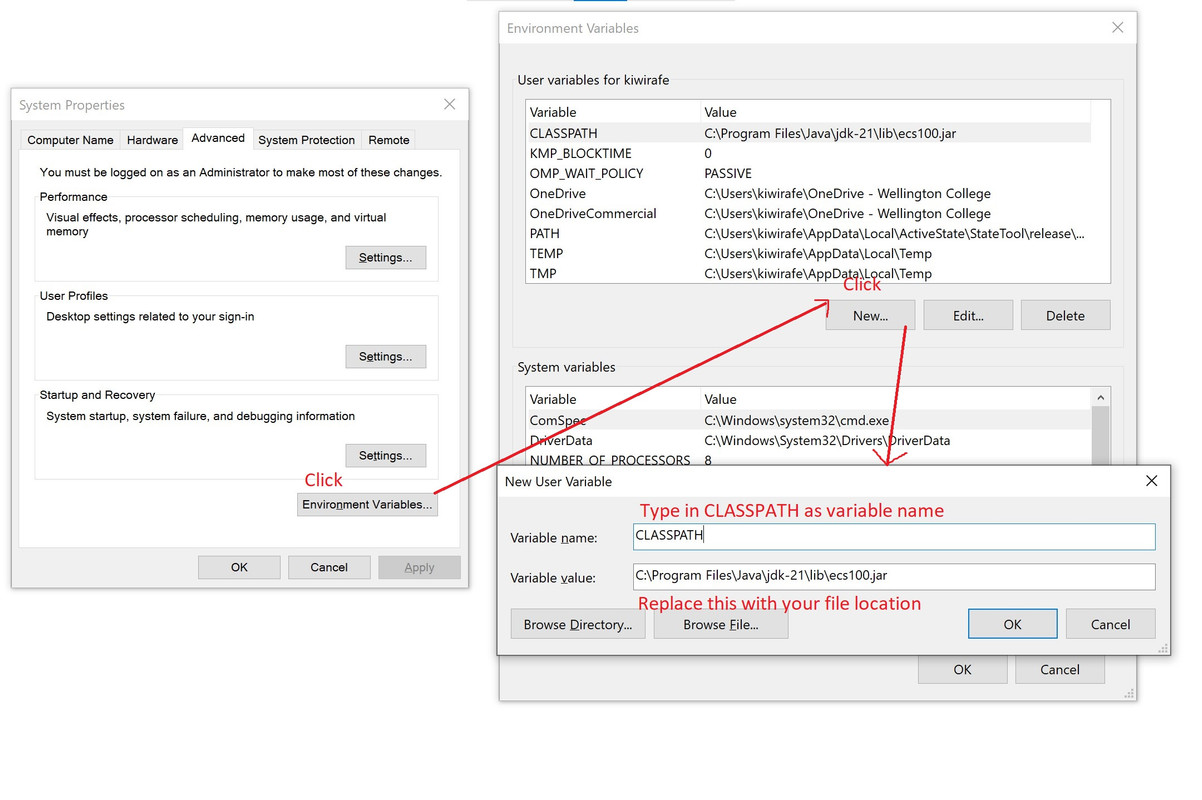
Step 5: Repeat Step 2 in Section 1 (ie. Search “PATH” and choose the “Edit system environment variables” option. Then click on the Environment Variables” button at the bottom right corner). Now, instead of double clicking “PATH”, click on the “New…” button in the middle. You should see a new panel pop up. Input “CLASSPATH” as the variable name and .;C:\Program Files\Java\jdk-21\lib\ecs100.jar as the variable value.
Note that if you have a different path from mine, then use .;{Your path to the file} as the variable value.
Finally, click on “OK” three times.

Step 6: Reboot the computer.
Step 7: Now run the test.java file with this command: java test.java. You should see it working as in Step 3. However, we have omitted the -cp part!
Futher Notes
Things get more complicated when you are dealing with multiple Java files. It turns out that we have to compile all the files first before running. Assume you have the two classes from file1.java and file2.java that you have used in main.java, you would use the following command:javac file1.java file2.java main.java; java -cp ".;%CLASSPATH%" main.java
If you have done Step 5-7 in section 2, you can omit the -cp part and use the following command:javac file1.java file2.java main.java; java -cp main.java
Otherwise, consider using Ant or Maven which are similar to Makefiles.